

Code Builder in Salesforce is a web-based development environment that empowers developers to customize or create new functionalities without needing any software installation on their local systems.
It’s an all-in-one integrated development environment (IDE) with the capabilities of VS Code, Salesforce Extensions for VS Code & Salesforce CLI.
This article will guide you through using Code Builder in Salesforce and explore its features designed to simplify the work of Salesforce professionals.
How to Setup Code Builder in Salesforce?
Code Builder is exclusively accessible in paid orgs. If you’d like to try it out but lack access to a paid org, consider signing up for a 30-day trial enterprise edition orgs.
Sign up to the trail org here
1. Click on the gear icon and in the quick find box search “Code Builder”
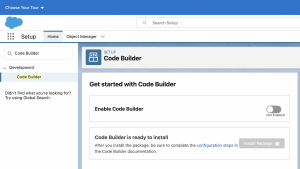
2. Activate the toggle button, then confirm the product term and proceed to click “Install Package”

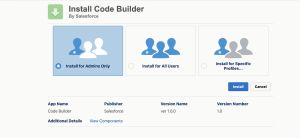
3. After clicking the “Install Package” button, a new tab will open, displaying all the details about the package.
Select Install for Admins only and click on the Install button.
By selecting “View Components,” you can view various components such as permission sets, tabs, apps, objects and more, all of which are part of this managed package.
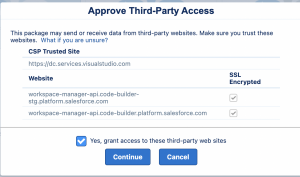
4. Approve the Third-Party Access and Click Continue
5. Go to the “Installed Packages” section in the setup menu, where you’ll find the Code Builder package listed in the installed packages.

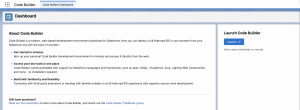
To launch the Code Builder application click on the App launcher and select Code Builder.

Click on the Launch button to start the Code Builder Application.
Also Read – Salesforce Optimizer Extension
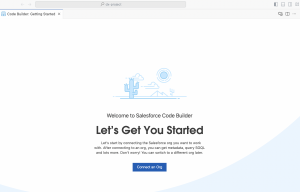
Connecting Code Builder to a Salesforce org
Click the “Connect an Org” button to link Code Builder with your Salesforce org.
After clicking the “Connect an Org” button, choose “Project Default” and provide an alias name for the org.
Enter the code displayed in the text box and click “Connect.” Log in using the appropriate username and password, then click “Allow”.
Finally, click “Continue” to establish the connection with the org.
Once the connection between the org and Code Builder is established, you’ll spot the alias name displayed in the lower left corner of your Code Builder interface.
Note: After setting up your Code Builder environment, you can conveniently access it from the dashboard whenever needed or save it as a bookmark for quick and easy access.
Want To Learn Salesforce Flows? Checkout our Salesforce Flow Course
Once the Salesforce org is successfully authorized, let’s explore the Code Builder interface.
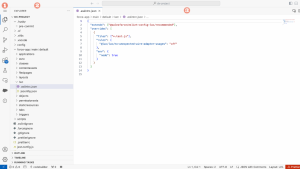
1. It features easily recognizable buttons that allow you to switch between various views.
2. It offers a range of helpful views to assist you in your project work. In this example, the Explorer view is shown, which displays the files within your DX project structure.
3. This serves as your primary workspace for editing files. The flexibility allows you to open multiple editors, arranging them side by side both vertically and horizontally.
Inside the DX-Project if you want to create any new component, you can Press Ctrl+Shift+P on Windows and launch the Command Palette.
Features of Code Builder in Salesforce
1. Org Browser
Org Browser is an integral component of the Salesforce Extension pack, serving as a convenient tool for effortlessly exploring and collecting metadata from your org without the need for a manifest file.
With Org Browser, you can seamlessly import metadata sources into your local project and make modifications.
2. Seamless GIT Integration
Code Builder seamlessly integrates with Git, simplifying the process of versioning and organizing your org’s metadata and code.
Because Code Builder doesn’t permanently retain changes, this feature also facilitates the creation of backups for all your modifications.
3. Einstein for Developers (Beta)
Einstein for Developers can produce Apex code through natural language.
You can easily install Einstein for Developers within Code Builder. This powerful tool, driven by Salesforce’s LLM technology, enhances productivity and expedites Salesforce customization.
It includes its dedicated Einstein Trust Layer, ensuring the protection of sensitive customer data within the Salesforce org.
4. Link to Multiple Salesforce Orgs
You can conveniently connect Code Builder to multiple Salesforce orgs, enabling seamless switching and work across different Salesforce environments with a simple click.
To switch to a different org, simply click on the name of the current org.
This action will open the Command Palette, where you can rerun the “SFDX: Authorize an Org” command.
5. Get to Know Code Builder Better
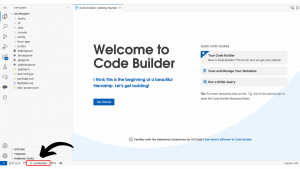
The most efficient way to become proficient in using Code Builder is to make use of the resources listed in the Code Builder Resource Panel.
You can access the Resource Panel menu from the activity bar inside Code Builder, as shown in the highlighted image below.
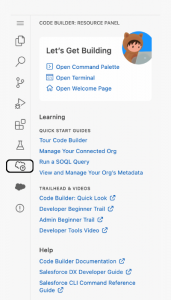
It consists of Trailhead modules, videos and help articles to assist you in your journey of exploring Code Builder.
6. Salesforce Extensions
As Salesforce users look to improve their workflow, Chrome extensions have become an essential tool.
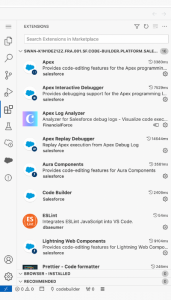
There’s no need to install the extensions to utilize them in Code Builder; you can access them through the Extensions icon in the left activity bar.
7. Execute Salesforce CLI commands
Code Builder includes the latest Salesforce Command Line tool (sf v2) already set up.
You can employ the Code Builder terminal to execute all Salesforce CLI commands, and it even allows the installation of third-party Salesforce CLI plugins.
Key Considerations
- Code Builder is a useful tool, but remember it’s not for permanent storage. Save your work in a more robust location, like source control or an org.
- When enabling Code Builder for Government Cloud, keep in mind there are specific considerations to address.
FAQs
1. How do I use Code Builder in Salesforce?
To access Code Builder, simply activate the Code Builder toggle button in the setup menu & install it in your paid Salesforce org.
2. Is Code Builder generally available now?
It is now accessible to all customers and it comes at no extra charge for Salesforce Professional Edition and higher tiers.
3. What is the use of Code Builder?
It includes pre-installed Salesforce Extensions for VS Code and Salesforce CLI, offering your preferred Salesforce languages like Apex, SOQL, Visualforce, Aura and Lightning Web Components for development.
It also comes along with useful developer tools such as Apex debuggers, Apex Log Analyzer and many more.
4. What is the allocation of Code Builder User licenses for various Salesforce editions?
The available number of User licenses for Code Builder are as follows:
- Professional Edition – 10
- Enterprise Edition – 40
- Unlimited Edition – 100
Conclusion
Salesforce Code Builder offers an array of features to enhance the developer’s productivity, including pre-installed Salesforce extensions and seamless Git integration.
For Salesforce developers, Code Builder is a must-learn tool for standing out among the competition and developing customized solutions with ease.


