


In this blog, we will explore the process of making an HTTP GET callout using Salesforce Flow.
Starting from the Summer ’23 release, Salesforce provided us with the functionality to make HTTP GET and POST callouts using Salesforce Flows.
Before we explore HTTP callouts using Salesforce Flow, let’s first understand what HTTP callouts are in Salesforce.
HTTP callouts allow Salesforce to initiate and interact with external systems and APIs using the HTTP protocol, allowing us to send the request and receive the response from external endpoints.
Exploring different HTTP methods & their purposes
1. GET – The GET method is used to retrieve data from the server.
2. POST – The POST method is used to send data to the server.
3. PUT – The PUT method is used to update or replace an existing resource of data with the provided data. For example, modifying an existing record in a database.
4. DELETE – The DELETE method is used to remove a specified resource from the server. For example, removing a user’s information from the database.
5. PATCH – The PATCH method is used to partially update existing resources on the server.
Configuring permission set for making HTTP Get callout using Salesforce Flow:
Before we make an HTTP callout using Salesforce Flow, we need to configure the HTTP setting permission in our Salesforce org.
Configuring this permission set allows the user to make a callout using Salesforce Flow.
Click on the ⚙ gear icon and navigate to permission sets.

Create a new permission set, click the manage assignments button & add your user to the permission set.

Now we need to configure named credentials and external credentials.

As you can see in the above image when we create a Named credential, external credential is a mandatory field.
So, we will create the external credential and then named credential.
External Credential

By implementing a reliable authentication protocol, you establish a secure link between Salesforce and external systems.
This fortified connection ensures that data exchange remains confidential and safeguarded from any unauthorized access.
While configuring external credentials we have three options to select from for authentication protocol.
- OAuth 2.0
- AWS Signature Version 4
- Custom
If the API don’t require a client and secret key then in that case we can use Custom authentication protocol.
To communicate with the API if a client and secret key is required then we need to select OAuth 2.0 or AWS Signature Version 4 as the Authentication protocol.
The protocol used to authenticate callouts to resources in Amazon Web Services over HTTP is AWS Signature Version 4. It requires the identity type to be Named Principal.
OAuth uses an authentication provider to issue a token to Salesforce after the user logs in via a browser and allows access to make a callout to the endpoint.
Want to Learn Salesforce Flows? Checkout our Salesforce Flow Course
In this example we are going to communicate with the publicly available API hence, we will use a custom authentication protocol.
After creating the external credential, we need to create principals.
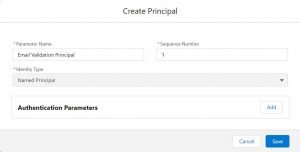
We can pass this principal record to our previously created permission set to grant it the ability to recognize the named credential.
Abstract Email Validation API
Now create the named credential. In this example, we are going to hit the email validation API of the Abstract API website.

Note: If you use the Abstract API website for free API callout testing, each user gets a unique primary key which you need to use for making a callout using Flows. Kindly keep the primary key confidential.
Named Credential
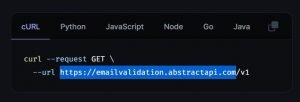
From the left panel click on documentation. Under the cURL panel copy the link to(.com) and paste it under the URL field of the named credential.
Read the email validation API documentation to learn more about this API and its response.
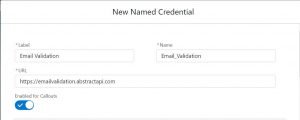
Select the Email Validation external credential in the external credential field and save the named credential.
Navigate back to the HTTP Callout Flow permission set you have created. In External Credential Principal Access add the recently created “Email Validation external credential”.

Creating Flow
As the initial permission setup is done, we will navigate to the Flow Builder and create a Screen Flow.
Using this Screen Flow we will capture the email Id from the user and pass it to the email validation API.
In response with the help of the screen component, we will display the result we receive from the API callout like whether the email Id is deliverable or not and also its quality score.

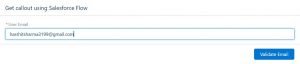
Drag the screen component to the canvas and add the email input component to it. We will set the email field as required so that every time user needs to provide input to get the result.

Click on the footer section and provide it with a custom Validate Email label.
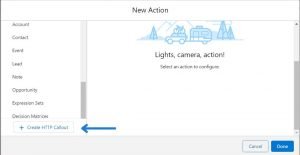
Configuring HTTP Callout
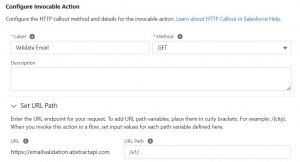
Now navigate to the Action element and click Create HTTP Callout button.
We will provide the external validation name. Select the named credential Email Validation.

Click next, now we need to provide the invocable action and Select the GET method. In the URL path, we will pass “/v1/” which represents the version of the API.
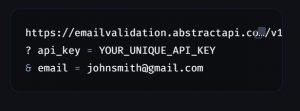
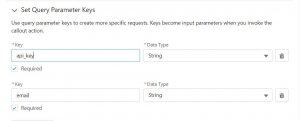
In the Set Parameter Keys section, we will pass both the parameters mentioned in the email validation API documentation.
Under Provide Sample Response section, click on the new button. Provide sample response JSON from the email validation API document and click review.

Once the JSON response is validated successfully, the complete data structure will be visible to you.
Note: If the JSON response fails while reviewing it, please check it using online available JSON formatting tools. Click Done
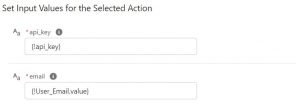
Provide a name to the HTTP callout Action. Create a resource with a resource type constant to store the value of the Primary key provided by the Abstract API website and pass it to the api_key field.
In the email field, pass the value from the screen component created to get the email Id from the user.
Before showing the result to the user, using the decision element we are going to check whether the API callout has been successful or not.

If the API callout is successful, the response code is 200
Add a screen component on the success path of the decision element to display output.
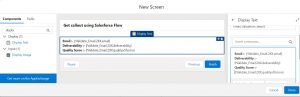
We will capture email, deliverability and quality score to display as the final result of the email validation API callout.
Save the Flow and click on Debug.
INPUT
API Callout Response OUTPUT

Check out more Summer’23 release Salesforce Flow features and enhancements here
For more details about the scenario discussed, please check out our video


