


In this blog, we will explore a step-by-step guide to creating custom notifications in Salesforce for any object using a record-triggered flow. This method ensures that alerts are delivered only to relevant users based on specific criteria, guaranteeing that the right people receive important information promptly.
By automating these notifications, we enhance efficiency by reducing manual effort and ensuring timely communication.
Custom notification in Salesforce Flow
Custom notification in Salesforce Flow is the easiest way to create alerts and notifications for our business purposes without writing any code. This flow can react to various events, such as record creation, field updates, or scheduled actions.
How do you send custom notifications in Salesforce Flow?
Scenario –
Let’s create one Custom notification for an Opportunity Object, when the stage gets changed to Closed won, it will show a notification on the bell icon.
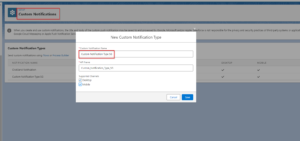
1. Create a ‘Custom Notification Type’.
- Go to Setup > Custom Notification Types.
- Click New.
- Give your notification type a name, like “Custom Notification Type SG.”
- Choose where the notification will appear: Desktop or Mobile App.
- Click Save.
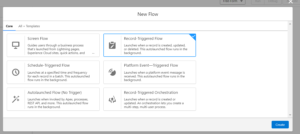
2. Build the Record-Triggered Flow:
- Go to Setup > Flows.
- Click New.
- Select ‘Record Triggered Flow’.
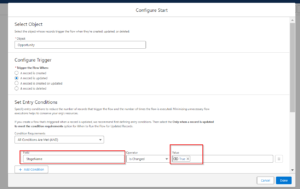
3. Configure the Object for which we want to create a Custom Notification.
- Choose Opportunity as the object.
- Configure Trigger – A record is updated.
- Set Entry Conditions – StageName Is Changed {!$GlobalConstant.True}.
- Click on Done.
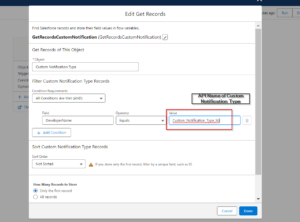
4. Add Flow Elements
- In the flow builder, drag a Get Records element onto the canvas.
- Set the object to ‘Custom Notification Type’.
- Filter Custom Notification Type Records -> Field(DeveloperName) Operator(Equals) Value(Custom_Notification_Type_SG) ->API name of Custom Notification Type which we created in Step 1).
- Click on Done.
5. Define Recipients Variable to store RecipientIDS:
- Click on New Resource, Choose Variable
- Give API name and Select Data type as Text and Save.

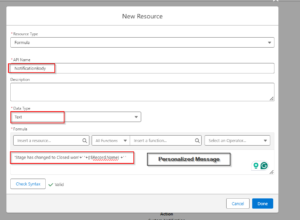
6. Create a Notification Body to personalize the message:
- Click On New Resource and select Formula.
- Give API name -> NotificationBody
- Select Data type as Text.
- Write your message in the formula section and then insert resource like record name – >’Stage has changed to Closed won’+’ ‘+{!$Record.Name} +’ ‘
- Click on Save
7. Assign Recipient IDs to the Account Owner:
- Click on the Assignment element.
- Give Lable and API name.
- Set Variable Values -> Variable{!RecipientIds} Operator (Add) Value{!$Record.Account.OwnerId}
- Click on Done

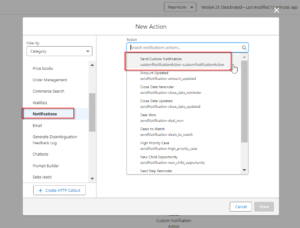
8. Configure Custom Notification:
- In the Category dropdown, Select Notification.
- Search ‘Send Custom Notification’ in the Action menu and select it.
- Provide Label and API name.
- In the Custom Notification Type ID, Select the GetRecordsCustomNotification ID which we created in step 4 -> {!GetRecordsCustomNotification.Id}
- In the Notification Body, Select the Notification Body that we created in step 6 ->{!NotificationBody}
- In the Notification Title, Provide any suitable title -> Opportunity Stage Changed
- In the Recipient IDs, Select the Recipient that we created in step 5 ->{!RecipientIds}
- If you want to include Sender then you can enable and include it as well.
- Set target Id as Record Id ->{!$Record.Id}
- Click on Done.

9. Save and Activate the flow.
- Click on Save then, Activate.
- Once it is activated, the final flow should look like the below image –

10. Test the flow:
- Click on the Opportunity tab.
- Open any record and change the Stage to the Closed Won.
- There will be one notification on the bell icon on the top right corner.

Also, Learn about 20 Important Validation Rules in Salesforce
FAQs
1. How can we get a custom notification type ID in Salesforce?
Go to the Salesforce Inspector, click on Data Export, and run a SOQL query like [SELECT Id, CustomNotifTypeName FROM CustomNotificationType], and Export.
2. What are the Recipient IDs and Target IDs in Lightning flow custom Notification action?
By using recipient IDs, users can determine who receives the notifications. You can add multiple user IDs, account IDs, opportunity IDs, or group IDs using a text collection variable. Additionally, the optional target ID feature provides a way to direct users to a specific record when they click on the notification,
Conclusion
In conclusion, to create a custom notification in Salesforce Flow for an Opportunity object when the stage changes to “Closed Won,” follow these steps: first, create a ‘Custom Notification Type’ in Setup.
Next, build a Record-Triggered Flow with the appropriate conditions. Use Flow elements to fetch the notification type and define recipient IDs, then set the notification message.
Configure the ‘Send Custom Notification’ action with the retrieved data, save and activate the flow, and finally, test it by updating an Opportunity record to see the notification in action.


