

This blog will explore the essential Apex Trigger best practices in Salesforce. It will help you avoid common pitfalls and optimize your Salesforce implementations. Apex Triggers in Salesforce are a powerful tool. They allow developers to perform custom actions before or after changes to Salesforce records, such as insertions, updates, and deletions.
While they offer a high level of customization and control, it is crucial to follow best practices. This ensures your code is efficient and maintainable.
It can be used to perform actions that can’t be possible with point and click method, solve complex scenarios based on some condition, and restrict users from executing certain actions.
What is the syntax of the trigger?
Here, we have to specify on which object our trigger would be, what are the events on which our trigger executes, the name of the trigger and the code logic.
Let’s see what are the best practices that we can follow while writing apex triggers
1. One trigger per object
We should always write one trigger per object as multiple triggers can lead to problems because there is no specific order. We cannot know which trigger will execute first. Consolidate all logic related to a particular object into a single trigger, and use helper classes to handle the specific logic.
Below is a sample of how can we achieve it.
Here, we are conditionally checking that if the trigger is in before or after then we are checking in what operations it is firing. We can execute logic according to that.
2. Logic less trigger
We should write logic-less triggers as it would make our trigger manageable, readable and less complex. We can use a helper class to divide the logic into methods.
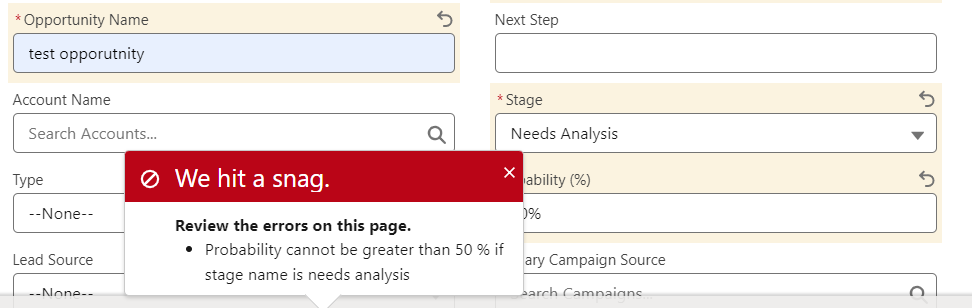
Below is a sample of how can we make a logic-less trigger. Here trigger is running on opportunity and we are throwing error message if the stage is in need of analysis and the probability is greater than 50%.
OpportunityTrigger.apxt
Logicless trigger code
OpportunityTrigger.apxt
OpportunityTriggerController.apxc
3. Bulkify your code
Always bulky your code. While writing the trigger logic always write by keeping bulkification in mind because when it executes with large data there might be chances it can hit the governor limit.
Let’s see an example of how we can bulkify our code. Below is the pseudo-code in which whenever we are updating the account its related contacts’s description should updated.
Non bulkified Trigger
Bulkified Trigger
Want to Learn Salesforce Flows? Checkout our Salesforce Flow Course
4. Use collections like List, Set and Map
Collections and maps are crucial for writing efficient Apex code. They help manage large data sets and perform operations in bulk. Maps, in particular, are useful for avoiding redundant queries by caching records in memory.
Trigger with the use of collections
5. Avoid recursion
Recursion occurs when a trigger causes itself to execute repeatedly, often due to updates made within the trigger. This can lead to infinite loops and exceed governor limits. We have different ways of avoiding recursion in triggers. The following are the ways:
- Static Boolean variable – We will use the boolean variable make it default true, and check the value if true, will enter it into the transaction and make it false afterwards.
- Static Set – In this process we will store the processed ID and check if the ID is contained in the Set or not.
- Static Map – Here, we will create a Map of String and Set of Id (Map<String, Set<Id>>) to store the processed Id with their event.
- Static Old Map – We will use the old map to compare the values before executing.
Other limits to consider
- Heap size limit – The heap size is dynamic memory allocation which is the memory that is stored while execution of the program. It will throw the error when the limit is reached which is 6MB for synchronous and 12 MB for Asynchronous.
- CPU Time Limit – Salesforce limits the CPU usage consumed in a given transaction, which is approximately 10 seconds for Synchronous, and 60 seconds for Asynchronous Apex.
- Limits on DML per transaction – We have 150 DML Limit execution for both synchronous and asynchronous transactions. If we perform DML more than that in a single transaction, it will throw the error.
- Maximum execution time – It is the time calculated to execute a single transaction in Apex which are 10 minutes for both asynchronous and synchronous.
FAQ’s
1. What is the maximum stack depth limit of the trigger?
The maximum stack depth limit will reached when the trigger recursively calls itself and the limit is 16. So when the trigger calls itself more than that we got the Maximum Trigger depth Exceeded error.
2. What is the code coverage required for the trigger?
All triggers must have at least one line of test coverage.
3. What is the maximum execution time?
We have maximum execution time for each Apex transaction is 10 minutes.
Conclusion
Implementing these best practices for Apex Triggers not only enhances the performance and reliability of your Salesforce applications but also ensures that your codebase remains scalable and maintainable. By adhering to a structured approach, leveraging bulk operations, and writing efficient code, you can avoid common issues and deliver robust solutions.


