


In this blog, we explore the 5 scenarios of Screen flows that we can implement to get hands-on practice, we can get access to the Screen flows by navigating to Setup > Flows > New Flow and selecting “Screen Flow.”

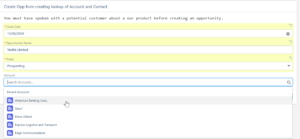
Scenario 1 – Opportunity Creation with Account Lookup.
Screen Element
- Drag the Screen element into the flow builder and Configure the Screen properties by API name and Label.
- Add a ‘Display Text’ component on the Screen and write a personalized text with the API name -> Requirement for creating opportunity.
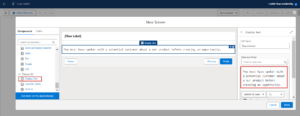
- Click on the Fields next to the component, on the new resource, and choose Variable to store the field of Opportunity.
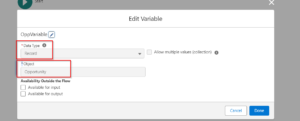
- Choose data type ‘Record’ and Object ‘Opportunity’ along with API name OppVariable.
- Drag the desired opportunity fields onto the screen. (Close Date, Name and Stage)
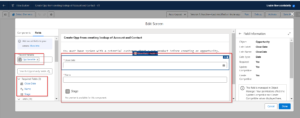
- Add a “Lookup” component to search for Accounts. Configure its API name, Field API name (AccountId), Label (Account), and Object API Name (Opportunity).
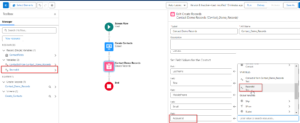
Record Element
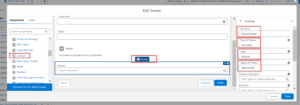
- Drag the ‘Create Record’ element onto the canvas and Configure the API name and Label.
- Select “Opportunity” as the object to create.
- Set the Field Values for the Opportunity
- Field – AccountId and Value – {!AccountScreen.recordId}
- Field – CloseDate and Value – {!OppVariable.CloseDate}
- Field – StageName and Value – {!OppVariable.StageName}
- Field – Name and Value – {!OppVariable.Name}

Debug the Flow to test (Create one Opportunity)
- Debug the flow to create a sample opportunity.

- Verify the newly created opportunity in your Salesforce org.

Scenario 2 – Create Contact associates with the Account in Screen Flows
Screen Setup
- Drag the Screen element into the flow builder and Configure the Screen properties by API name (Create_Contacts) and Label (Create Contacts).
- Create a variable named “ContactFields” (data type: Record) to store contact information.

- Drag the required contact fields (FirstName, LastName, Title, MobilePhone, Email) onto the screen.

- Click on New Resource, Select Variable, and choose Data Type as Text.

Create Record Element
- Drag a “Create Record” element named “Contact_Demo_Records” with a Label (“Contact Demo Records”).
- Select Contact object from an Object dropdown.
- Now, Set the Field Values for the Contact.
- Field: FirstName Values: {!ContactFields.FirstName}
- Field: LastName Values: {!ContactFields.LastName}
- Field: Title Values: {!ContactFields.Title}
- Field: MobilePhone Values: {!ContactFields.Title}
- Field: Email Values: {!ContactFields.Email}
- Field: AccountId Values: {!RecordId}
- Click on Done.
Test the flow
- Click on Debug.
- Provide the Account ID for which you want to create an associated contact.

- Fill in the required contact details during the flow run.

- Check the newly created contact record linked to the specified Account.

Scenario 3 – Generate leads through Screen Flows
Screen Setup
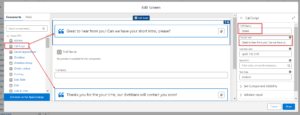
- Drag the Call Script Component into the screen and Configure the API name (Details) and a personalized message called Script Text.
(Great to hear from you! Can we have your short Intro, please?)
- Drag the Screen element into the Canvas and Configure the Screen properties by API name (Lead_Generation) and Label (Lead Generation).
- Introduce a variable named “LeadFields” (data type: Record, object: Lead) to store lead information.

- Drag the desired lead fields (Full Name, Company, Status) onto the screen.
- Click on Done.

Create Record Element
- Drag the Create Record element into the Canvas and Configure the Screen properties by API name (Generate_Lead) and Label (Generate Lead).
- Select a Lead object from an Object dropdown.
- Now, Set the Field Values for the Lead.
- Field: First Name Values: {!LeadFields.FirstName}
- Field: Last Name Values: {!LeadFields.LastName}
- Field: Company Values: {!LeadFields.Company}
- Field: Status Values: {!LeadFields.Status}

Test the flow
- Click on Debug and Run.
- Fill in the lead details in the provided fields.

- Check the generated lead in the Salesforce Org.
Scenario 4 – Retrieving Account Record ID
Create Variable
- Create a variable to store the Account record ID.

- Drag the ‘Get Record ‘ Element onto the Flow Builder.
- Configure the API name, Choose the object Account, and set the condition.
Field – Id, Operator – Equals and Value – {!AccountRecordId}

- Drag a Screen element and configure its API name.
- Click on the Resource picker, write your personalized text “My Account ID” then click on Insert Resource Choose the Variable {!AccountRecordId}.
- Again, Click on the Resource picker write your personalized text “My Account Name:” then click on Insert Resource Choose the Record Element Variable {!Get_Acc_ID.Name}.
Debug the Flow
- Click on the Debug and Run

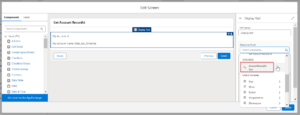
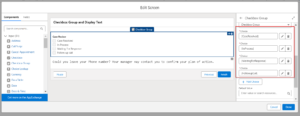
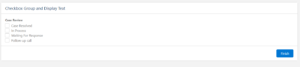
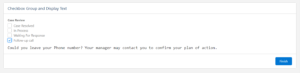
Scenario 5 – Use of Checkbox Group and Display Text in Screen Flows.
Screen and Checkbox Group Setup:
- Drag the Screen element into the Canvas and Configure the Screen properties by API name (Use_of_Checkbox_Group_and_Display_Text) and Label (Use of Checkbox Group and Display Text.
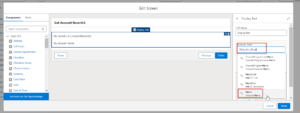
- Drag the ‘Checkbox Group’ Component onto the screen and enable multi-selection.
- Select the Checkbox group in Component Type.
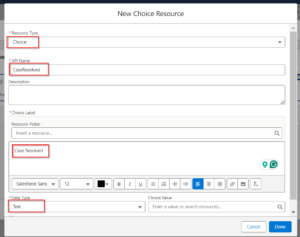
- Add multiple choices representing different options (e.g., Follow-up Call, Case Resolved, Waiting for Response) by clicking “+Add Choice” and defining the API name, Choice Label (text displayed to users), and data type (Text).
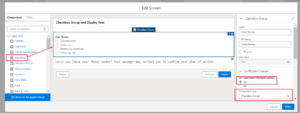
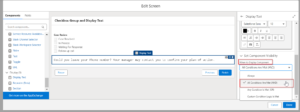
Conditional Display Text:
- Drag Display Text onto the Screen and Configure the Screen properties by API name (CaseReviewWarning).
- Provide a message in the Resource picker you want to display conditionally (e.g., “Could you leave your phone number? Your manager may contact you to confirm your plan of action”).

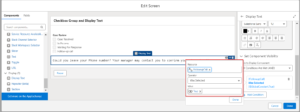
- We can Set Component Visibility according to a situation, Here I want to display this text whenever a User checks the “Follow-up call” choice from the Check box group.
- Select ‘All Conditions Are Met (AND)’ from the drop-down.
- Set the condition –
Debug the Flow
- Select different checkbox options and observe how the text visibility changes based on your selections.
Also, Learn about Custom Notification in Salesforce Flow
FAQs
1. How do I add Screen flows to the user experience in Salesforce?
We can add Screen flow directly on the Record Page, App Page, and Home page. Click on the edit page on the Gear Icon and go to the App builder which allows the User to drag the flow component to the Canvas of the App builder and Save the changes.
2. How we can use Screen Flows in the Experience Cloud?
In Experience Builder, navigate to the target page/template. From the toolbox, drag the Flow component to the desired location. Select the specific Screen Flow you want to display from the component properties dropdown menu.
Conclusion –
This blog provided a hands-on exploration of five practical Screen Flow scenarios in Salesforce. The step-by-step process guides you through creating opportunities with account lookups, associating contacts with accounts, generating leads, retrieving account IDs, and how to use checkbox groups with conditional text displays.


