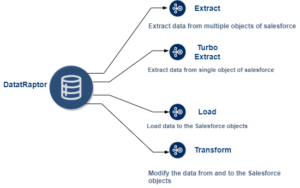
This blog explores how we can utilize Omnistudio Data Tool – DataRaptor and its types to access read, write, transform, calculate and track data in the Salesforce org.
DataRaptors is a mapping tool in Omnistudio facilitating the seamless handling of Salesforce data enabling users to read, write & transform data.
DataRaptors play a pivotal role in streamlining the integration of your applications with Salesforce. They accomplish this by seamlessly delivering data from the database to various components like Cards, Integration Procedures and OmniScripts enhancing the functionality of your ecosystem.
Types of DataRaptors
Go to App Launcher –> Click on Omnistudio –> Select Omnistudio DataRaptor –>Click on new –>Give DataRaptor Interface Name –>Choose Interface Type from the drop-down menu (Extract, Turbo – Extract, Load, and Transform).

1. Extract
DataRaptor Extract retrieves data from multiple salesforce objects reads data and returns results in JSON, XML, or custom formats. It contains five tabs –
Extract Tab
The Extract tab allows you to select the Salesforce objects you want to retrieve data from and define filters to specify which specific data from those objects will be included in your results.
- Click the + Add Extract Step button and choose the object you want data from, like “Account.”
- Now for the Configuration setting for the Object, give a name to the “Extract Output Path”, and try to keep it in the name of the Source object only as it defines the top node of JSON (Ex-Account).
- If you only want specific data, use the filters. Choose the field you want to filter on (left side), select the comparison operator (middle), and then choose the value:
Specific value: Enter a value like a record ID directly.
Variable: Use a variable defined elsewhere to hold a dynamic value.
Another field: Compare to another field within the same object.
Previous extract step: Compare to data you already filtered in a prior step.

Output Tab
DataRaptor’s Extract Output tab allows you to define how the data retrieved from Salesforce (using the Extract tab) gets structured in the final output JSON. This process involves mapping specific fields from the extracted data to desired locations in the final JSON structure.
- Extract JSON Path: In this field, you choose the Source field of the object.
- Output JSON Path: Here, you specify the desired output for the chosen field in the final output JSON.


Formula Tab
This tab allows us to add data to the output of our DataRaptor. Go to the Formulas tab within your DataRaptor. Click Add Formula to create a new one.
- In the Formula field, enter the logic you want to perform. For example, to add country code to the phone number, use: (“+91” + Account: Phone.)
- In the Formula Result Path, choose the JSON node where you want to store the calculated value and also map this Output JSON path with the Extract JSON path.


Preview Tab
For testing the input and output of a DataRaptor Extract we can use the Preview tab by providing the value to the key. For example, suppose we want to extract data for Accounts where “CleanStatus” equals “Pending” and “PrimaryContactId__c” equals “0035i0000FtQFrUAQW”. We’ve defined variables “CS” for “CleanStatus” and “CON” for “PrimaryContactId__c” in our filters. Now, in the Preview tab, we will give value to the variable.


2. Turbo Extract
Turbo Extract performs better at runtime because it extracts data from a single object. Unlike DataRaptor Extract, Turbo Extract does not include a formula or output tab but supports a Preview Tab.


(The process for selecting data and using the Preview tab remains the same as explained for DataRaptor Extract).
3. Load
DataRaptor Loads act as a bridge between your external data and Salesforce. They can accept data in various formats, including JSON, XML, and even custom formats, and transfer it to your desired Salesforce objects.
Objects Tab
The Objects tab, lets you select the Salesforce object where you want to create or update records. (Ex-To create a contact, select ‘contact’.)

Field Tab
This tab determines which fields you want to provide values for when creating the records for an object.
Input JSON Path: Specify the key name that holds the value you want to put into Salesforce.
Domain Object Field: Choose the exact field in the Salesforce object you want to map with the key name mentioned in the Input JSON Path.

Preview Tab
In the Preview tab, we are required to input a JSON file in order to assign values to the specified keys listed in the Field section.

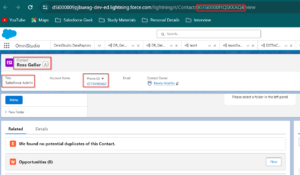
We can click on the generated link of the record ID and check the Contact record in the Org load by the DataRaptor.

4. Transform
DataRaptor Transforms allows users to make intermediate data modifications without accessing Salesforce. These transformations support formulas and enable conversion between JSON and XML formats. Users can restructure input data, rename fields, substitute values, and convert data into formats like PDF, DocuSign or Document Template.
Transforms Tab
Click the “+” button to add a new mapping.
In the “Input JSON Path” field, specify the location of the data in the input format. Use colons (:) to separate levels within the data structure (like Contact: Name).
In the “Output JSON Path” field, specify the desired location for the data in the output format. You can also rename the field here.
(like Person: Name).


(The process for selecting data and using the Preview tab remains the same as explained for DataRaptor Load).
Want to Learn Salesforce Flows? Checkout our Salesforce Flow Course
FAQs
1. How do I use DataRaptor in Omniscript?
We can use DataRaptor in Omniscript by following the steps:-
- Go to the step where you want to interact with DataRaptor in your Omniscript,
- Drag & drop the “DataRaptor Action” element onto your Omniscript.
- Click on the DataRaptor action to open the properties panel.
- Name your action and select the desired DataRaptor from the dropdown.
2. What is the governor limit for DataRaptor?
The governor limit for DataRaptor relies on Salesforce services, which have limits on processing time. While setting a record limit (e.g., 2,000) helps avoid exceeding these limits, it’s not a foolproof solution.
The complexity of processing is what truly matters. Focus on optimizing your DataRaptor actions to ensure smooth operation.
3. What is the difference between the DataRaptor extract and the DataRaptor Turbo extract?
DataRaptor Extract offers greater flexibility, allowing extraction from multiple Salesforce objects with complex filters and data manipulation. However, it may take slightly longer to process. It supports formulas and output.
On the other hand, DataRaptor Turbo Extract prioritizes speed and simplicity, ideal for retrieving data from a single Salesforce object quickly but it does not support formulas within the extract and field mapping customization in the output JSON.
Read more – Flexcard Designer in Omnistudio
Conclusion
This blog post discusses DataRaptor, a powerful tool in Omnistudio for manipulating data within Salesforce. It covers the four types of DataRaptor: Extract, Turbo Extract, Load, and Transform. The Extract type retrieves data from multiple Salesforce objects, allowing filtering and formula manipulation.
Turbo Extract prioritizes speed for retrieving data from a single object but has fewer features. Load acts as a bridge for transferring external data into Salesforce objects. Transform enables data modification without accessing Salesforce and supports formula creation and format conversions


