


Salesforce Flows enable us to Create multiple Records in any Standard or Custom Objects along with API-only objects. In this blog, we will explore how to use Screen Flow to create multiple records with an example.
Create Record Element:
- We can create single or multiple records simultaneously depending on how we configure the Create Record Element in Salesforce Flows.
- You can achieve the simultaneous creation of multiple records using the ‘Record Collection Variable.’
Business scenario: Generate a custom object Project’s record by using the Project Limit field from the Opportunity Object.
Pre-requisite:
- Create a ‘Project Limit’ field with a Number Datatype on the Opportunity object.
- Create a Custom Object ‘Project’ with the following fields: Project Name (Auto number), Start Date and End Date. These fields will be used to store the project details
- The Opportunity object is related to the Project object by a Master-Detail Relationship, with Opportunity serving as the Parent/Master and the Project as the Child.
Screen Flow:
- The Screen component in Screen Flow is used to collect user input and is arranged on the Screen Canvas as per requirement.
- The Screen flow holds the input till the flow ends. To save the data beyond the end of the flow run, we need to use a data element like create Records.
Screen components:
- Display Components are used to display the information.
- Input Components are used to receive input from a user. They are similar to fields in an object like Text, checkbox, date and date/time and many more.
- Record Fields: They not only receive input but also store the same in a record variable.
Let’s Start building the Flow.
Create Screen Flow:
Drag and Drop the ‘Display text’ component on the screen and enter the details below.

Create New Resource: Variable Resource is created with data Type ‘Record’ to get data from Opportunity record.

Add a Text field to display the Opportunity Name with {!Opportunity.Name}
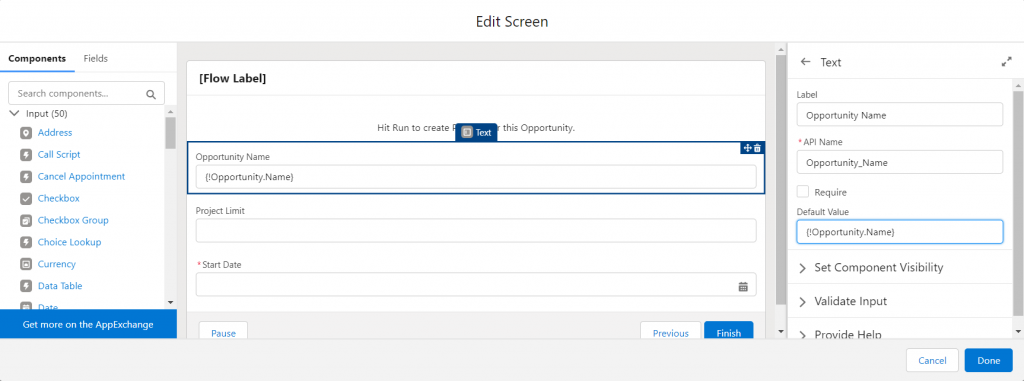
The number field is used to get the ‘Project Limit’ with Default value {!Opportunity.Project_limit__c}

The Date field is used for the ‘Start date’ and mark it as required.
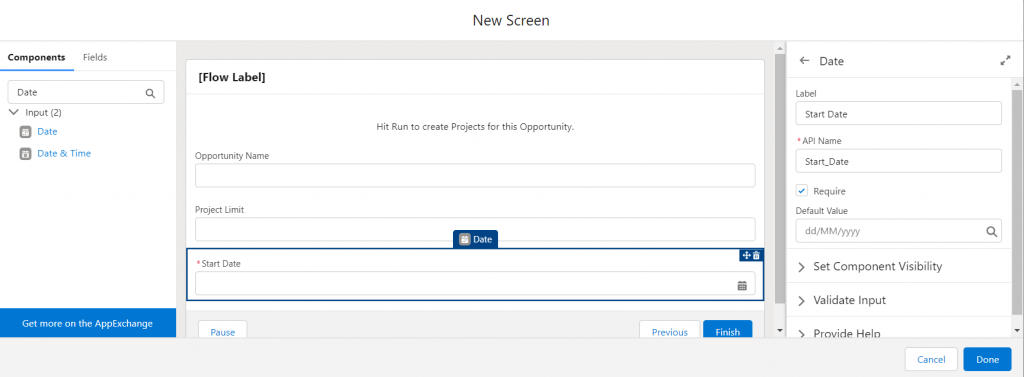
Enter the Label and Click on Done.

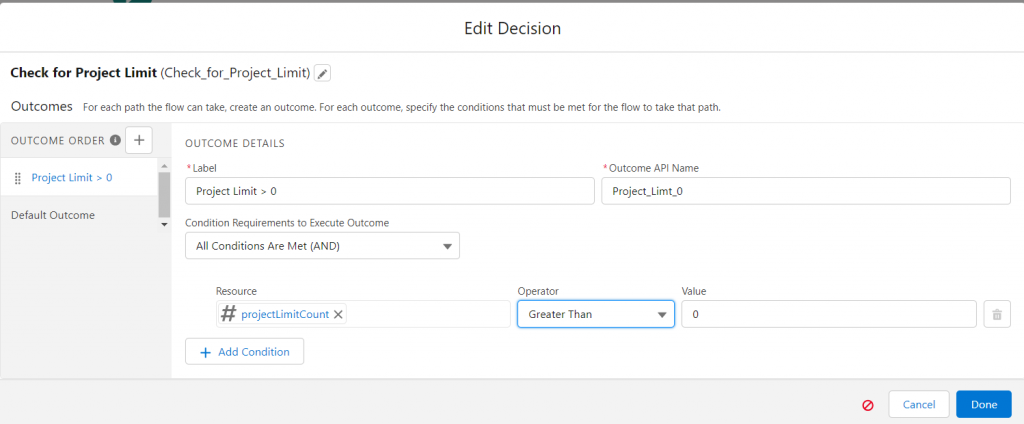
Decision Element is used to check if the Project Limit on a particular Opportunity is greater than zero.
Want To Learn Salesforce Flows? Checkout our Salesforce Flow Course
The assignment element is used to create a Project Instance.
Create a New Resource for the assignment element to store the record’s ID for the Project object.

Assign the first variable value of Project Start date Equals {!Start_Date}
Create a new resource with the resource type as Formula, calculated as {!Start_Date} + 21, indicating that each project concludes after 21 days.

Set the Project Opportunity variable to {!Opportunity.ID}.
A Project Collection variable is created to store this project instance as we are creating multiple Project records. This Add condition should be the last condition to get the required results.

Assignment Element for Decrement:
- Create a new variable as shown below.
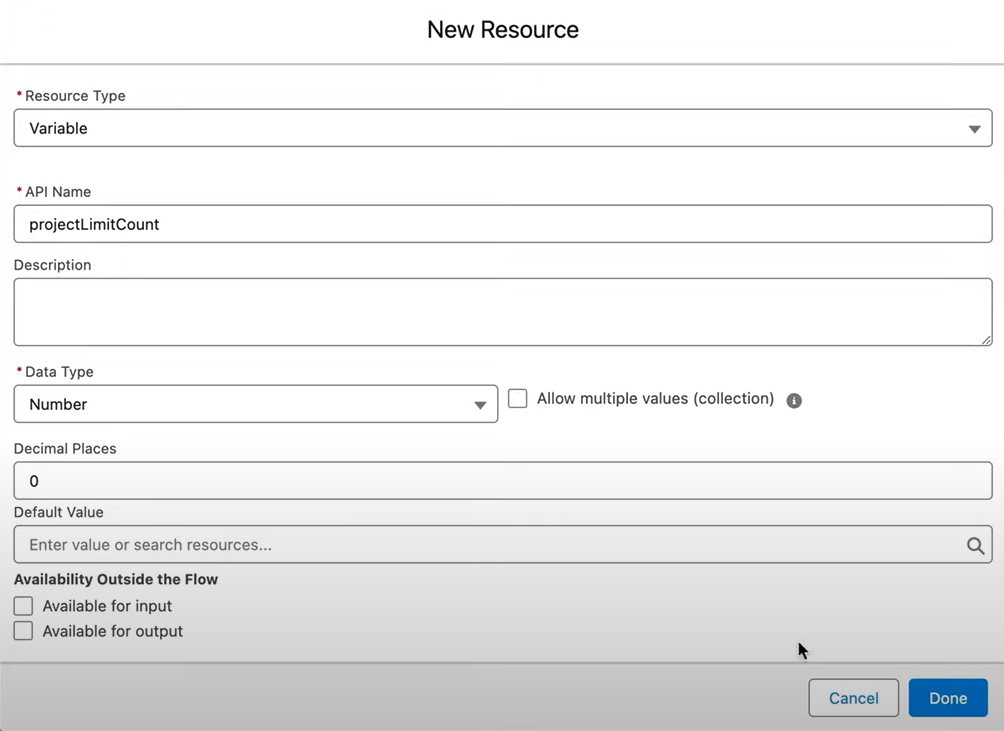

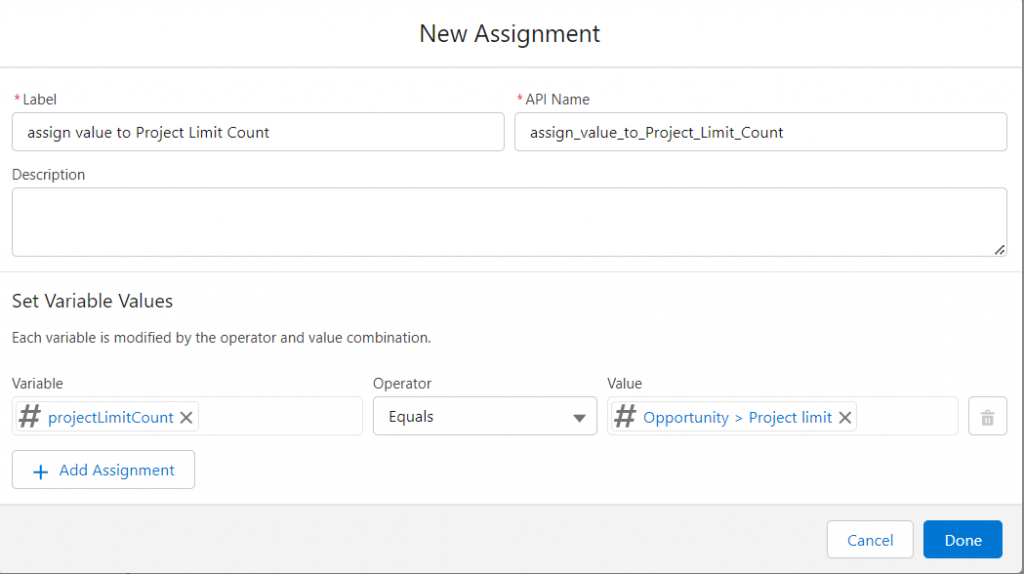
Assign Value to projectLimitCount:
- To set the value for projectLimitCount as Project Limit add another Assignment Element after Screen Element in the Flow.
- To meet the requirement set variable value as {!projectLimitCount} Equals {!Opportunity.Project_limit__c}
Edit Decision Element:
- Change Resource from ‘Opportunity Project Limit’ to ‘projectLimitCount’

Connect the ‘Project Limit > 0’ path with the Decision element ‘Check for Project Limit’
Save the Flow to Create multiple records with the Label ‘Create N Projects’
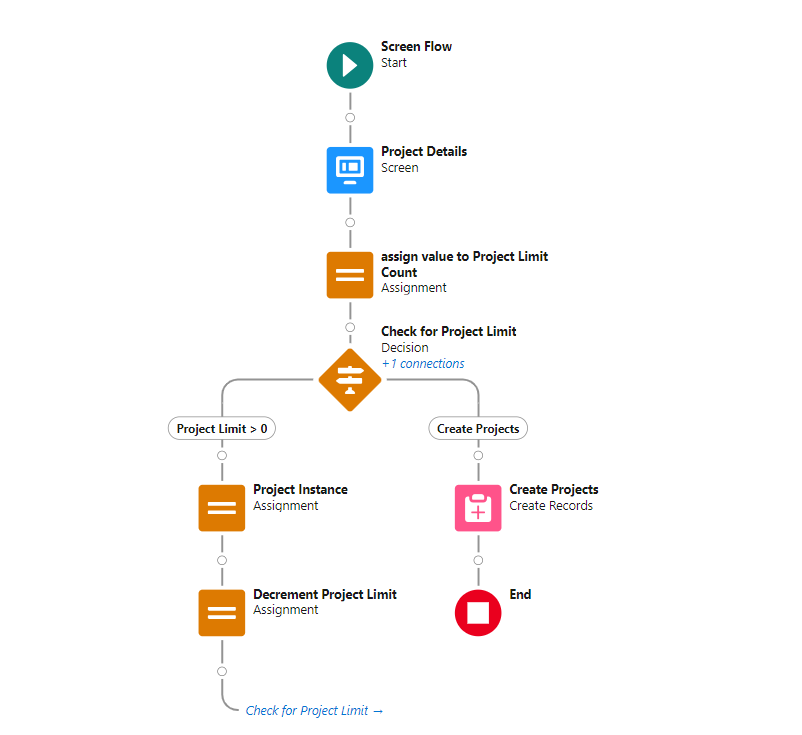
Now, Change Auto-Layout to Free-Form to get a clear understanding of how this flow works.

From Screen Element, we get the input from the User. In the Assignment Element, we associate a number variable with the Opportunity Project Limit.
The decision Element checks whether the project Limit Count is greater than 0.
Create a Project Instance with variable Project Start Date, End Date and Project Opportunity. Further, we add this created Project instance to the ‘Projects’ collection variable.
The Decrement Project Limit Assignment element reduces the Project Limit Count by 1.
Create Record Element:
Place the Create Record Element on the Default Outcome Path of the Decision Element. This Element creates multiple records on the Project Object.
Connect Decision Element with Create Record Element. Change the Default Outcome Label to ‘Create Projects’
Save and activate the Flow. The Free Form and Auto Layout of the created Flow are as below.

Add Flow to Opportunity Record page:
- Open any Opportunity Detail Page and click on Edit Page from the Setup icon.
- Drag and Drop ‘Flow’ from Components to the canvas.
- Click on the Flow component then select flow ‘Create N Projects’ and mark ‘Pass all field values from the record into this flow variable’ as Checked.

- Click on save and Activate the page.
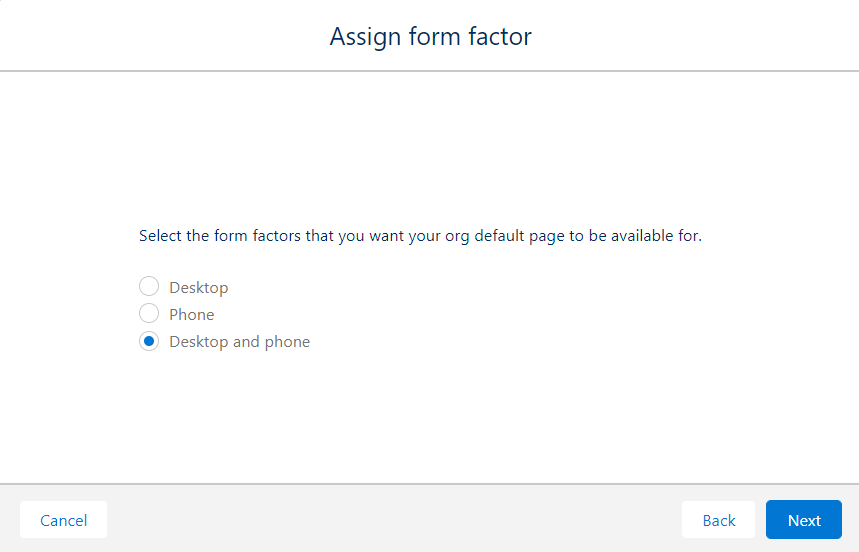
- On the Activation page, click on ‘Assign as Default Org’ and make it available for ‘Desktop and Phone’. Save the page.
Additionally, our Flow is now visible on the Opportunity Record Page.

The Opportunity Name and Project Limit will appear by default so add the Start date and Click on Next.
Now we can see the Projects in the Related List. When we check for some Opportunity records where Project Limit doesn’t have any value, Records are not created even if the flow runs. To overcome this make the Project Limit field required on the Screen Element.

Hence, High-volume Data entry can be done easily ensuring data accuracy using Salesforce Flows.


