

In this blog, we will explore the case management process, covering its various stages and key components such as Case Assignment Rule, Case Escalation Rule, Auto-Response rules, and Web-to-Case functionality.
What is Case Management?
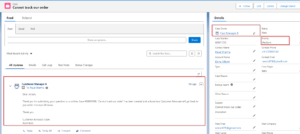
A case represents a customer’s question, feedback, or issue. Salesforce cases are very important for managing customer interactions, as they help resolve customer issues efficiently. It allows you to track and address customer issues, providing a comprehensive view of each customer.
Stages of Case Management Process –
1. Case Creation
Cases can be created through Automation (Web-to-Case and Email-to-Case) and manually (Case tab and Contact).
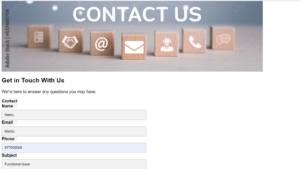
Web-to-Case:
Customers can submit Cases from a web form on your website.
- Click on the Web-to-Case HTML Generator in Salesforce Setup.
- Configure desired fields for the form.
- Provide URL for redirection after form submission.
- Generate the HTML code.
- Copy the generated HTML code, paste it into any text editor, and save it as a .html file.
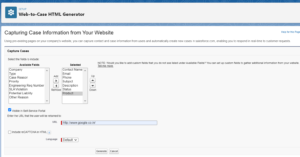

- Open the form in the web browser.
- Fill out the form with the necessary details and click “Submit.” Then, check the newly created Case in your Salesforce Org, which was generated from the Web-To-Case form.
Email-to-Case:
You can automatically convert incoming emails into cases by setting up an Email-to-Case address. The system will generate one Email Service Address. When a customer sends mail to this address, the system will automatically convert it into a Salesforce case.
- Search for “Email-to-Case” in Set-up and open it.
- Create a Routing Address and click “New Routing Address”
- Specify the name and a unique email address for your Email-to-Case system.
- Enable Email addresses.
- Enable Create Task from Email and Select “Not Started” from drop-down.
- Set up email notifications for Case owners (optional).
- Set Case Priority and Case Origin.
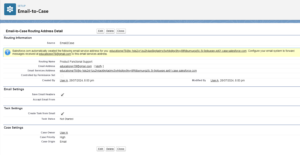
- Save the Routing Address, after saving it will provide “Email Services Address” which will be the public-facing email address that customers will use to submit Cases.

- Copy the Email Services Address, compose an email and paste the Email Services Address into the recipient field to send the email to the system.
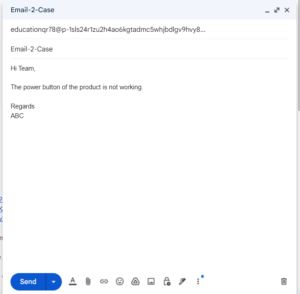
- Send a test email to the email services address to verify Case creation.

- Check on the Case record created by email and check the Case record’s details for Email-to-Case information.

Cases tab:
- Navigate to the Cases tab, click “New,” and fill in the Case details.
Contact:
- Create Cases from Contact records for associated issues.
- Go to the Contact’s record, click “New” in the Cases related list, and fill in the details.
2. Case Assignment
Salesforce uses automated rules and manual transfer to send the right Case to the right agent. This process helps in efficiently assigning Cases.
Automated Case Assignment:
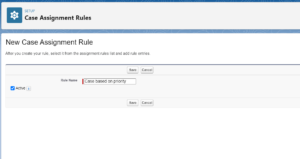
A Case Assignment Rule automatically assigns incoming Cases to specific users or queues based on the defined criteria.
- Click on “Case Assignment Rules” in the Quick find box (Setup).
- Click the “New” button to create a new assignment rule.
- Give your rule a name.
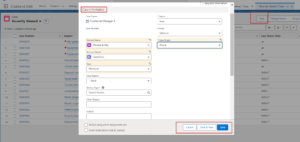
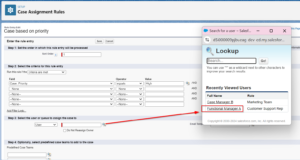
- Create Rule Entries:
Click “New” to add a new rule entry.
Order: Provide the order number of the rule entry. . The first rule with matching criteria will be applied.
Criteria: SSpecify the Criteria for the rule to apply. You can use fields like Case origin and Case priority.
Assign To: Select the user to assign the Case. - Check the “Active” checkbox to activate the rule. Only one rule can be active at a time.
- Click on Save.
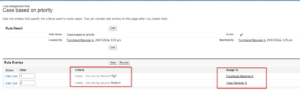
Scenario 1.
Cases with high priority will be assigned to Functional Manager A.

Scenario 2 –
If Case Priority is Medium then it will be assigned to Case Manager B.
Test the Rule
Create one Case with high priority.
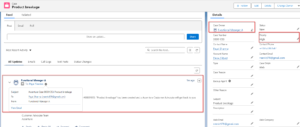
Create one Case with Medium priority.
Case ownership can be manually changed: There is also an option for manual transfer of Case ownership if needed.
- Go to the detail page of the Case record.
- Click on the Change Owner icon near the Record Owner name.

3. Case Handling
It’s very important to handle Cases at the right time, especially when they are urgent or if an agent or manager is unable to resolve them.
In such Cases, Salesforce provides Escalation Rules to escalate the Case to a higher level. Additionally, customers should receive clear responses to their queries, which can be achieved using the Case Auto-Response Rule in Salesforce.
Escalation Rule –
Case escalation in Salesforce automatically reassigns or escalates a Case to a higher-level support agent or team when it meets certain criteria or stays open too long.
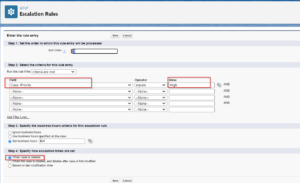
- In the Quick Find box, type “Escalation Rules” and select “Escalation Rules”.
- Click “New” to create a new escalation rule.
- Provide Name and Click on Checkbox and Save.
- Now, Click on the name of the Rule to Configure.
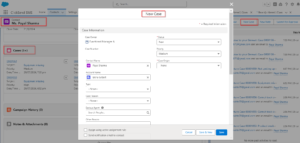
- Click “New” to add a new rule entry.
- Define the order of the rule entry.
- Specify the conditions for the Case to escalate
Field – Case:Priority Operator:Equals Value:High - Specify the business hours criteria for this escalation rule – Select Use business hours specified on the Case.
- Specify how escalation times are set – Select When Case is created.
- Click on Save.
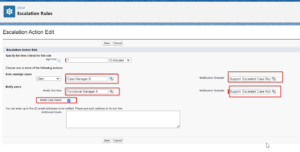
- Click “New” to add Escalation Action.
- Specify the time criteria for this rule for ex- 1 hr 30 min.
- Specify the User for Auto-Reassign Cases.
- Specify which User to be notified.
- Select Notification Email Template from lookup.
- Save the Rule.
Test the Rule –
-
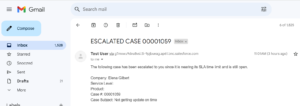
Scenario – A high-priority case will be created, and if it is not closed within 1 hour and 30 minutes, it will be escalated to Case Manager B. Case Manager B will then receive a notification via email.
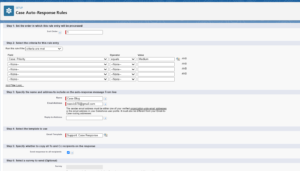
Case Auto-Response Rules
Case Auto-Response Rules automatically send customers a standard reply when a case is made, informing them that their issue has been received and providing some initial information.
- In the Quick Find box, type “Auto-Response Rules” and select “Case Auto-Response Rules”.
- Click “New” to create a new Auto-response rule.
- Provide Name and Check on Active Checkbox.
- Create Rule Entries:
Click “New” to add a new rule entry.
Order: Define the order of the rule entry.
Rule Criteria: Specify the conditions for the Auto-response to be sent.
Email Template: Select the email template to be sent. - Specify the name and address to include on the Auto-response message From line by providing Name and Email.
- Select the template to use from Lookup.
- Check on the Checkbox “Send response to all recipients.”
- Save the Rule.
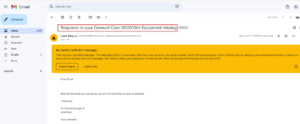
Test the Rule:
Create a Case with medium priority, then check the email address you provided during Case creation. You should receive an Auto-Response email confirming your Case submission.
4. Case Support
Tracking Customer Feedback and Issues: Agents keep track of all customer remarks, reviews, feedback, and issues. This helps them understand the problem and find the best solution.
Related list: Use related lists to quickly access customer’s Contact, account, and related Case information. Additionally, use Case feeds to monitor all Case activities and set up alerts for timely updates on customer actions.
5. Case Closure
Ensuring Customer Satisfaction: Salesforce Case Management ensures that a Case is closed only after offering a satisfactory solution and confirming that the customer is happy with the outcome.
Best Practices of Case Management Process.
Use Email Templates to Respond to your Customers.
It speeds up responses and ensures customers get accurate and prompt information. Email templates help in quick reply to the customer’s questions and standard responses. This saves time and keeps communication consistent.
Track Performance with Reports and Dashboards.
Reports and dashboards give a clear view of how well Case management is working. They help track performance and highlight areas that need improvement.
Use Record Types to Simplify Case Handling
Record types let you organize Cases according to different business processes. It also makes Case handling easier by giving agents a customized view, which reduces confusion.
Also, Learn about Lead Management in Salesforce
FAQs
1. What are the various stages in the Case Management Process?
The stages in the Case Management Process are – Case Creation, Case Assign, Case Manage/Handle, Case Support and Case Closure.
2. Who can create a Case in Salesforce?
The User with a Salesforce License can create a Case in Salesforce.
3. What are the Components of the Case Management Process in Salesforce?
Case assignment, Case escalation, Case Auto-Response rules and Web-To-Case.
Conclusion
In this blog, we have learned the Salesforce Case Management process with all implementation in the Org, which includes stages like Case Creation, Assignment, Handling, Support, and Closure. It helps track and resolve customer issues using tools like Web-to-Case, Email-to-Case, and automated rules for assigning and escalating Cases.


