

Salesforce continues to push the limits of no-code/low-code development through robust automation capabilities such as Flow. One of the most impressive features introduced in recent releases is the Rollback element in Salesforce Flow. It enables Admins and Developers to recover from errors and roll back unwanted data modifications, maintaining data consistency and improving user experience.
In this blog article, we’ll dive into the Rollback Records feature using a Screen Flow scenario between two associated objects, Contact and Case.
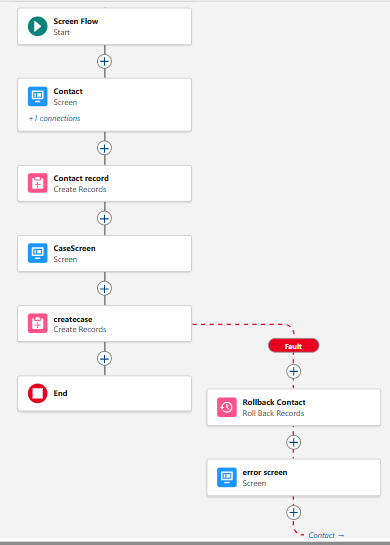
Use Case Overview
We’re building a Screen Flow that does the following:
- Takes Contact information (Salutation, Last Name, Currency, Phone) via a screen.
- Creates a Contact record and stores its ID in a variable.
- Displays another screen for Case creation (Subject, Status, Case Origin).
- The Case record is related to the previously created Contact via the stored ID.
- If the Subject field is left blank, a Validation Rule prevents the Case from saving.
- Upon validation failure, the Flow uses Rollback Records to delete the Contact record.
- The user is shown an error screen and redirected back to the Contact input screen to start over.
Salesforce Flow’s Rollback Records feature enables you to revert uncommitted changes introduced by the ongoing flow transaction, essentially cancelling DML actions such as create, update, or delete. It comes in particularly handy in error-handling branches or when maintaining data integrity in intricate automations.
This example showcases how Rollback Records can help avoid orphaned records (e.g., a Contact without a valid Case) and preserve your org’s data integrity.
Object Configuration:
1. Contact Object Fields:
- Salutation (Picklist)
- Last Name (Text) – Required
- Currency (Picklist/Text) – Optional
- Phone (Phone) – Optional
2. Case Object Fields:
- Subject (Text) – Required via Validation Rule
- Status (Picklist) – Default values like “New”, “Working”, “Closed”
- Case Origin (Picklist) – Values like “Phone”, “Email”, “Web”
- ContactId (Lookup to Contact) – To relate it to the newly created Contact
3. Validation Rule on Case:
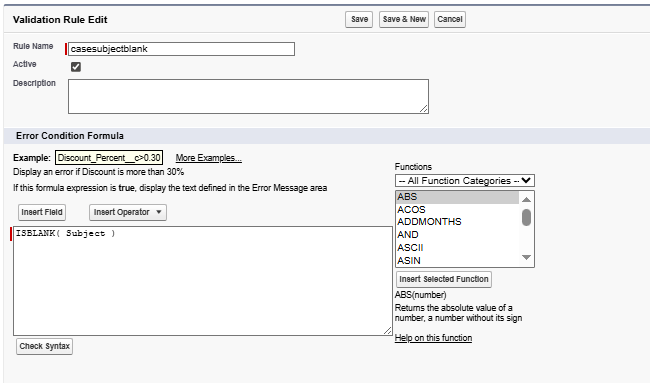
Error Message: “Subject is required. Please enter a valid value.”
This rule ensures a blank Subject will block the Case record from saving, which will allow us to test our rollback functionality.
Step-by-Step Flow Design
Let’s build the Screen Flow step by step inside Flow Builder.
1. Create New Flow
- Flow Type: Screen Flow
- Make sure it runs in User Context with access to create records.
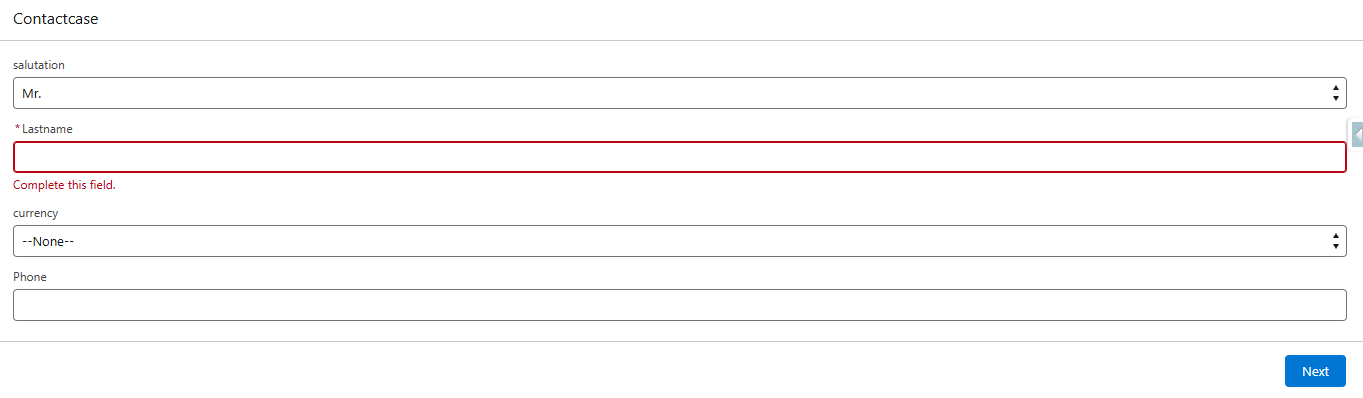
2. Screen: Get Contact Info
Add a Screen Element named Enter Contact Details with the following input fields:
- Salutation (Picklist with values like Mr., Ms., Dr.)
- Last Name (Text – Required)
- Currency (Text or Picklist)
- Phone (Phone)
Store each field in its own variable (e.g., varSalutation, varLastName, etc.)
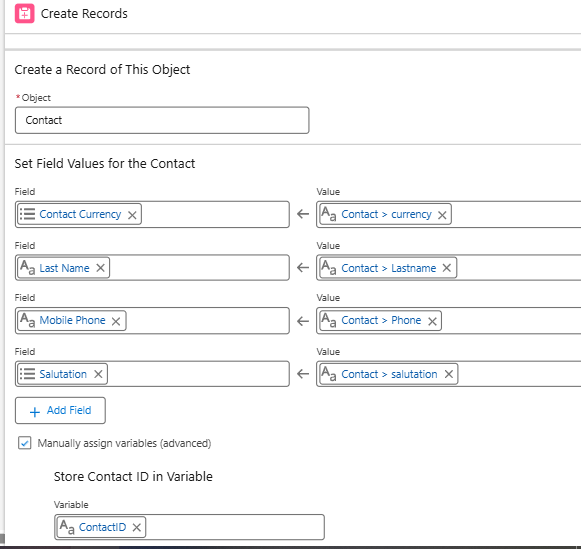
3. Create Contact Record
Use a Create Records element:
- Label: Create Contact
- Object: Contact
- Map input fields from the screen variables
- Store the created record’s ID in a variable: varContactId (Data Type: Text)
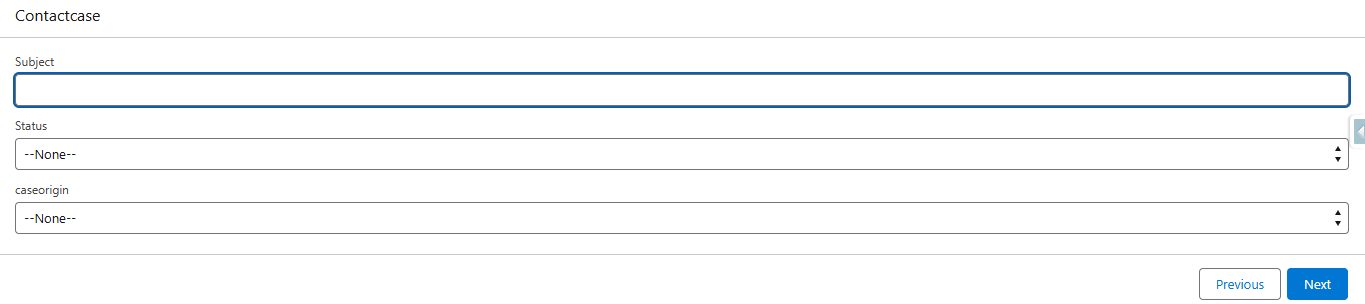
4. Screen: Get Case Info
Add another screen titled Enter Case Details with:
- Subject (Text – Required visually, but the real enforcement comes from Validation Rule)
- Status (Picklist)
- Case Origin (Picklist)
Store inputs in variables like varSubject, varStatus, and varCaseOrigin.
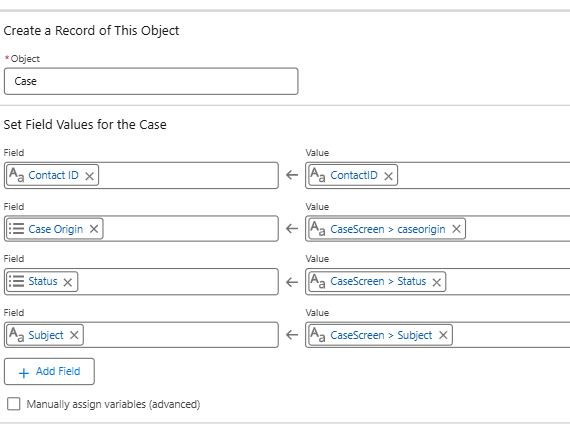
5. Create Case Record
Use a Create Records element:
- Label: Create Case
- Object: Case
- Field Mappings:
–>Subject → varSubject
–>Status → varStatus
–>Case Origin → varCaseOrigin
–>ContactId → varContactId
Wrap this element inside a Fault Path to catch any failures from Validation Rule.
6. Error Handling with Fault Path
This is where things get interesting. If the Subject is blank, the Create Case step will fail due to the validation rule. So, you need to:
Fault Connector from “Create Case” → Subflow/Branch
Drag the Fault Path connector from Create Case to the next element: Rollback Records.
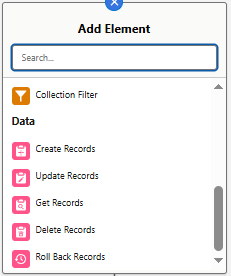
7. Rollback Records Element
- Label: Rollback Contact
- This element will undo any DML operations done before the failure — including the Contact record creation.
- Add this as the first item in the fault path.
With this, the partially completed Flow execution is canceled, and no records are saved.
8. Error Message Screen
After Rollback, add a Screen Element:
- Title: Error: Submission Failed
- Message: “Case creation failed due to missing Subject. Contact record was not saved. Please correct the issue and try again.”
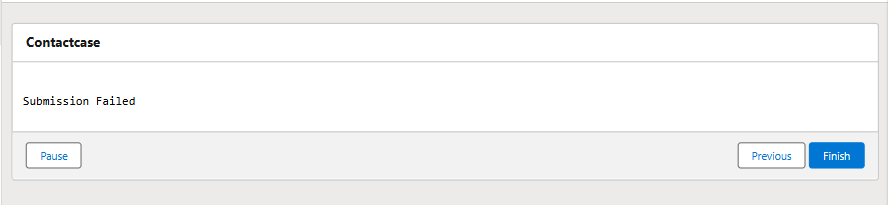
Add a button labeled Go Back that leads to the Start again.
9. Loop Back to Contact Entry Screen
Connect the screen’s button (Go Back) to the Enter Contact Details screen to let the user retry.
This gives the user a clean and intuitive way to fix their mistake without cluttering your database.
Flow Testing Scenarios
Let’s walk through a few test scenarios:
Scenario 1: All Valid Inputs
- User enters valid Contact and Case details.
- Both records are created successfully.
- Flow ends with a success message.

Scenario 2: Missing Case Subject
- User enters valid Contact details.
- Enters blank Case Subject.
- Case fails to save due to validation rule.
- Rollback Records is triggered — Contact record is deleted.
- Error message is shown.
- User is taken back to Contact input screen.

This is the real power of Rollback Records — it acts as an “undo” for your Flow operations, mimicking a transaction-like behaviour.
Key Benefits of Using Rollback Records
1. Cleaner Data
You avoid creating half-baked or orphaned records (e.g., Contacts with no valid Case).
2. Improved User Experience
The user knows exactly what went wrong and can easily fix it, all within a single Flow.
3. Transactional Behavior
You can now build all-or-nothing logic in Flows, just like Apex transactions.
4. Debugging Made Easier
Combining validation rules with rollback and fault paths gives you greater control and easier debugging.
Best Practices and Considerations
- Always store record IDs after creation if you plan to rollback or relate later.
- Use fault connectors generously to trap errors and guide users.
- Avoid writing flows that do partial commits unless intentionally designed that way.
- If needed, pair Rollback Records with Pause elements or Assignment variables for more complex scenarios.
- Always test multiple edge cases (e.g., blank values, picklist edge cases) before releasing to production.
Read more – Salesforce Flow Best Practices
FAQ’s
1. What does “Rollback” mean in the context of a Salesforce Screen Flow?
It refers to the ability to undo or revert database changes (DML operations like Create, Update, Delete) that have occurred within a flow’s transaction if an error occurs or a specific condition is met, thus maintaining data integrity.
2. Can the “Rollback Records” element selectively undo specific DML operations, or is it an “all or nothing” operation?
It’s an “all or nothing” operation for the current transaction. The Rollback Records element rolls back all pending DML operations that have occurred within the flow’s current transaction up to that point. You cannot choose to roll back only some DML actions while keeping others committed
Conclusion
The Rollback Records feature of Salesforce Flows represents a significant leap towards enterprise-quality, codeless automation that you can rely on. Paired with validation rules, fault paths, and intelligent screen design, you can offer your users a seamless experience and maintain your org’s data consistent and clean. This Contact–Case use case is only the tip of the iceberg. You can apply this principle to multi-object flows, approval flows, lead conversion flows, and more.


