Salesforce Flows are an incredible tool for automating processes without writing code. One everyday use case is creating a record and automatically navigating the user to it after completion. This functionality is convenient and saves time, making the entire process smoother for the user.
When creating a record using Salesforce Flows or implementing custom clone functionality, one common challenge is that users are not automatically redirected to the newly created record. This lack of navigation can disrupt the workflow, requiring manual searches to locate the record.
Automatically navigating to the new record enhances the user experience by streamlining access for immediate updates or follow-ups, ensuring a smoother and more efficient process.
Example: Create Contact Records and Navigate to newly created records in Salesforce Flow
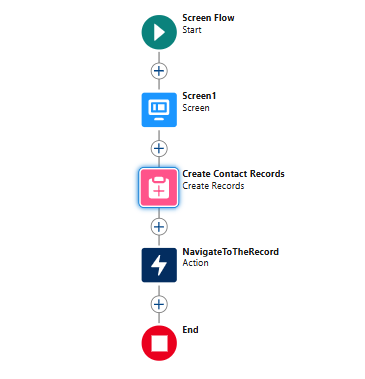
Let’s walk through an example where we build a Flow to create a Contact record using Screen, Create Record, and Action elements, and then navigate to the newly created record.
Open Salesforce Flow Builder
Click Setup and go to Create, Click on Flows, then click Start from Scratch to create a new one. Select the Screen Flow option and click Create to open the Flow Builder.
Add a Screen Element
Begin by adding a Screen element to collect information for the new contact. Name the screen. Enter Contact Details. Inside the screen, add input fields for the user to enter the Contact’s details.
For example, include fields for Name, Phone number, Email, and description. Make the fields required based on your requirements.

Want to Learn Salesforce Flows? Checkout our Salesforce Flow Course
Add a Create Record Element
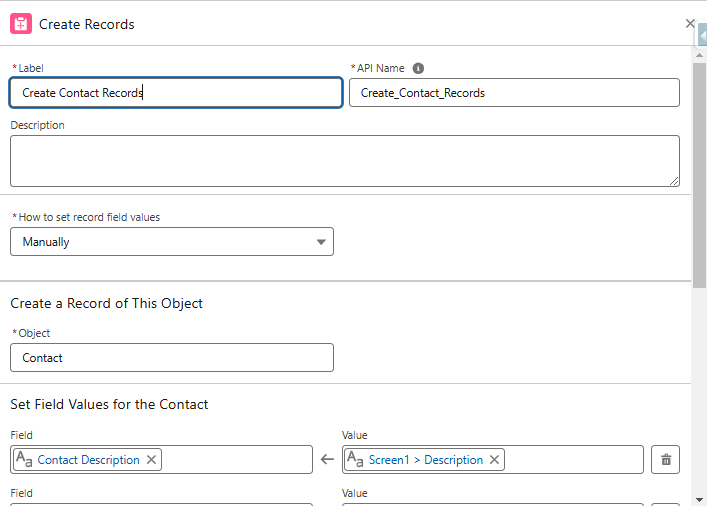
Next, add the Create Record element to create the Contact. Name it Create Contact. Choose the option to create one record and select Contact as the object.
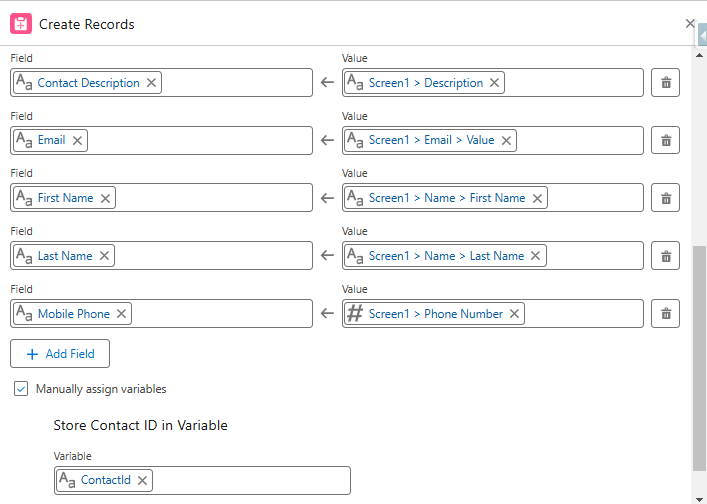
Map the fields collected from the screen to the corresponding fields in the contact object. For instance, the First Name field from the screen will map to the First Name field on the Contact, and so on.
Additionally, enable the option to Manually Assign Variables to store the new Contact’s ID. Create a variable (e.g., ContactId) to hold this record ID. Once done, save the element.
Prerequisites for Using Local Actions
Create a custom Aura component (or build one) to handle navigation using the force:navigateToSObject Lightning event. The component should include:
- Component Markup: A record ID attribute that accepts the ID of the created record.

- Design Resource: Declaration of the record ID in the design file to make it configurable within the local action.

- Client-Side Controller: JavaScript logic that uses the force:navigateToSObject event to redirect to the record.

Please refer: Redirect Flow Users with a Local Action
Add an Action Element:
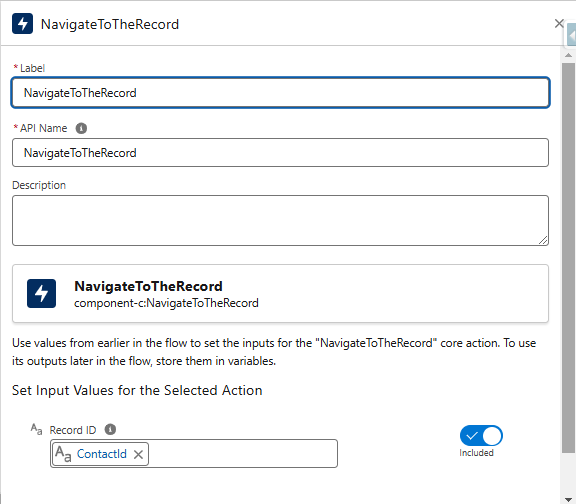
After creating the record, use an Action element to navigate to the new record. Please search for the Navigate to Record action in the action library and select it.
In the action settings, map the variable storing the contact’s ID (e.g., ContactId) to the Record Id field. This tells Salesforce to navigate to the specific record you just created.
Click Save in the top-right corner and provide a name for your flow, such as “Create Contact.” Once saved, click Activate to enable the flow.
Adding the Flow to a Record Page or Home Page
To add the flow to any page, open the page and click the Gear Icon at the top. Select Edit Page to access the layout editor.
Drag the Flow component to where you want it on the page, choose your flow and save your changes. Don’t forget to activate the layout so users can see it!

Also Read: What is Model Builder in Salesforce?
FAQs
Is there a limit to how many flows we can create with navigation actions?
Salesforce does not impose specific limits on navigation actions in Flows. However, org-wide flow limits, such as the number of active flows and overall complexity, should be considered to maintain performance.
How do we add the flow to a record page?
In Salesforce Lightning App Builder, drag the Flow component to a record page layout, select your flow, and save and activate the page to make the flow accessible to users.
What happens if I don’t set up the navigation action?
If you don’t configure the Navigate to Record action, users will stay on the flow screen after creating the record, requiring manual navigation to find the newly created record.
Conclusion:
Navigating to newly created records in Salesforce Flows saves time and simplifies tasks. Using screen flows with the Navigate to Record action reduces extra steps. Adding the flow to a record page makes it easily accessible, improving the overall Salesforce experience.


