


This blog article explains how to create and use Dependent Picklists in Salesforce Screen Flows. Dependent Picklists provide options based on the value selected in Controlling Picklists, ensuring that users can choose only valid options.
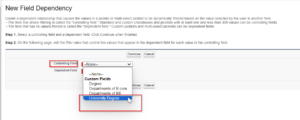
For implementing this it is important to create a relationship between both the picklists in other words, we need to create field dependencies.
For example, a CommunicationMode__c object will contain a Controlling field “Online” and the Dependent Field will be Email.
Dependent Picklist in Salesforce Flow
In Salesforce Screen Flows, a dependent picklist is a feature that creates a relationship between two or more picklist fields. The choices shown in the second selection list (dependent Picklist) are actively adjusted according to the option chosen in the first selection list (Controlling Picklist).
Scenario –
There’s a picklist field called Degree__c in the Student__c object. If a student selects “B.com” from the dropdown, an additional picklist field named DepartmentB.com__c should appear with options “Applied Economics, Accountancy, Tax and Finance and Marketing Management.
1. Create Picklist Fields and Fields Dependency:
In the Salesforce Setup, navigate to Object Manager > Student__c > Fields & Relationships.
Create the following fields:
-
- University_Degree__c (Picklist) with values Bachelor of Commerce (Parent Picklist)
- DepartmentB.com__c (Picklist) with values Applied Economics and Tax. (Child Picklist)

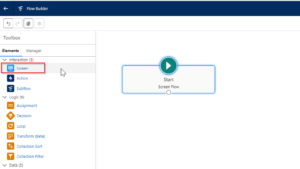
2. Building a Screen Flow:
- Open the Setup menu and search for “Flow” in the Quick Find box.
- Click on Flow Builder and create a new Screen Flow.

3. Adding the Screen element:
- Drag the Screen element from the palette and add it to the flow screen.
4. Configuring the Dependent Picklist:
- In the Screen Properties, provide a label.
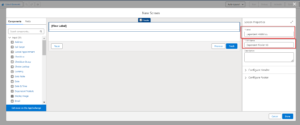
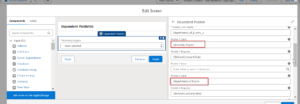
- In the Dependent Picklist Component, fill in the following details:
- API Name: Enter University_Degree__c (the parent picklist).
- Picklist 1 Label: Enter a label for the parent picklist (e.g., “University Degree”).

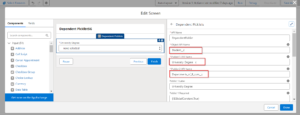
5. Specifying the Object and Picklist Details:
- Object API Name: Enter Student__c (the object where you want to use the dependent picklist).
- Picklist 1 (Parent) API Name: Enter University_Degree__c.
- Picklist 2 (Child) API Name: Enter DepartmentB.com__c.
- Picklist 1 Label: Enter a label for the parent picklist (Optional).
- Picklist 2 Label: Enter a label for the child picklist (e.g., “Department (B.Com)”). (Optional)
6. We can also make Picklist required by setting the global constant as true or false.
- {!$GlobalConstant.True} – To make the field required.
- {!$GlobalConstant.False} – To make the field not required.

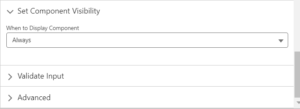
7. Component Visibility – You can control when a component shows up on the screen based on different rules:
- Always: Set it to ‘Always’ to display the dependent picklist.
- Specific conditions: Show it only if certain things are true (AND or OR logic).
- Custom logic: Show it based on any code you write.
8. Click on the Advanced property and Select ‘Manually assign variables’, provide a Variable to store the output values.
- Defining Variable for Picklist 1 Values:
- Click on New Resource.
- Choose Variable.
- Enter an API name like PicklistValues1.
- Set the data type to Text.
- Click Done.


9. Repeat Step 8 for Picklist 2 Values:
- Create another variable (e.g., PicklistValues2) for the child picklist values using the same steps.
10. Click Debug to test the flow functionality.


11. Adding the Flow to the Student Record Page:
- Go to the Edit Page layout of the student record page.
- Drag and drop the flow component onto the canvas.
- Select your flow name from the dropdown on the left side.

13. Now, In the Student’s record, you’ll see the dependent picklist. Selecting “Bachelor of Commerce” will display the relevant department options.

Also, Learn more about Data Table in Salesforce Flow
FAQs
1. What is the difference between picklist and Multipicklist in Salesforce?
2. What is the difference between controlling and dependent picklists?
3. How do I add a picklist to a flow in Salesforce?
Conclusion
This blog post highlights the use of dependent picklists in Salesforce Screen Flows. These picklists dynamically adjust available options based on user selections.
The blog provides a step-by-step guide on how we can set up dependent picklists in Screen Flows.


