

Salesforce is mostly known for its robust automation features, and the Approval Process stands out as a powerful tool for streamlining business processes. In this blog, we will drive into the Salesforce Approval Processes. We will get an idea of how we can implement it in our Salesforce org with a real-world use case.
The Approval Process in Salesforce is an automated process provided by Salesforce as a point-and-click tool where there is no need for code to handle record approvals. Whether it’s a sales discount greater than a specific value, an expense report or any requests that require a manager’s approval, approval processes make sure that every record is reviewed by the right person in the right way before any further actions are taken.
In this blog, we’ll walk through a simple example by setting up an approval process for a sales discount request.
Approval Process Components
Before designing any approval process, we will need to consider the following steps:
- Initial Submission Actions: Actions performed when a record is submitted, such as locking the record when it’s required or sending a notification.
- Approval Steps: Each step in the process includes its own set of criteria and actions. We can set up multiple steps if a record needs to be reviewed by more than one approver/person.
- Final Approval Actions: These actions take place once all approval steps have been completed. Examples include updating record fields, sending emails, or creating tasks.
- Final Rejection Actions: Actions triggered when a record is rejected, such as sending an email notification or unlocking the record.
- Recall Capability: Allows the submitter to withdraw the record from the approval process under certain conditions; it can be an optional step based on business requirements.
Now will see a practical example where we set up an approval process in Salesforce. In this scenario, a sales discount request needs to be approved by the manager if the discount percentage is greater than 15%.
Use Case:
When a sales representative applies a discount greater than 15% on an Opportunity record, the discount must be approved by the Sales Manager. This ensures that high discounts are scanned to protect profit margins.
Objective:
Implement an Approval Process that:
- Triggers when the discount on an Opportunity goes above 15%.
- Send the record for approval to the Sales Manager.
- Locks the record during the approval process to prevent further changes.
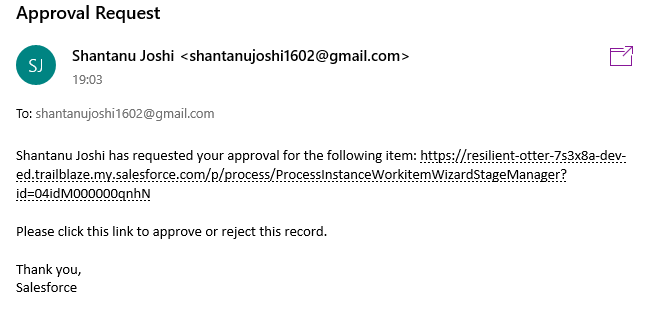
- Send an email notification upon submission.
- Unlocks and updates the record based on the approval outcome.
- Send an email notification to the user if it’s rejected or approved.
Prerequisites
Before implementing this process, make sure that:
- Salesforce Admin Access: We must have System Administrator access in our Salesforce org.
- Custom Fields: Make sure that the Opportunity object has a custom field for the discount. For example, we might have a “Discount %” field. If not, create one.
- User Roles: Ensure that the Sales Manager role or a specific user is assigned to handle the approval requests
- Email Templates: Create an email template for notifications related to the approval process.
Step 1: Define the Approval Process
1. Navigate to Setup:
In Salesforce, click on the gear icon and select “Setup.”
2. Find Approval Processes:
In the Quick Find box, type “Approval Processes” and then select it.
3. Create a New Approval Process:
Choose the required object we want to apply the process to in this example, we are using the ‘Opportunity’ object. Click on “Create New Approval Process”.

4. Give Name to Our Approval Process:
Give our process a descriptive name such as “High Discount Approval Process.”
Step 2: Configure Entry Criteria
In the entry criteria section, define when we want the approval process to trigger.
- Set Proper Criteria:
- Field: Discount %
- Operator: Greater than
- Value: 15
- It will ensure that only Opportunity records with a discount percentage greater than 15% are submitted for approval.
- Additional Conditions:
We can add more conditions if required, such as checking the Opportunity stage or amount. For our example, the discount threshold is sufficient here

Step 3: Set Up Approval Steps and Approvers
- Define the First Approval Step:
Click on “Add New Step” to define the approval step. We can name it as “Sales Manager Approval.” - Specify the Approver:
In the step settings, assign the Sales Manager as the designated approver. We can choose a specific user or a role. - Determine Step Criteria:
The criteria for the approval step should align with our initial criteria. In this case, since only records with a discount greater than 15% reach this step, no additional criteria are required. - Set Step Actions:
Optionally, configure actions that occur when this step is approved. For example, if we want to update a status field on the Opportunity record to “Approved”

Step 4: Define Final Approval Actions
- Actions Upon Final Approval:
When the manager approves it, you’ll need to define the next steps. Common actions include:- Record Update: Change the Opportunity status to “Approved” and update other custom fields if required.
- Email Notifications: Send an email to the submitter or other set of users informing them of the approval.
- Unlock the Record: If the record was locked during the process, unlock it as the record is approved or unapproved by the manager.
- Configure Actions:
In the “Final Approval Actions” section, add the necessary actions. For instance, choose “Field Update” to mark the Opportunity as “Approved,” and select “Email Alert” to send the approval confirmation.
Step 5: Configure Rejection Actions
- Actions Upon Rejection:
Similarly, define the actions for when a record is rejected:- Record Update: Change the Opportunity status to “Rejected.”
- Email Notification: Inform the submitter of the rejection.
- Unlock the Record: Allow the submitter to modify the record for resubmission if required as per the business requirement.
- Configure Actions:
In the “Final Rejection Actions” section, add these actions. For example, set up an email alert that notifies the sales rep that the discount request has been rejected.
Step 6: Testing the Process
Once our approval process is set up, thorough testing is crucial to ensure that it works as expected.
- Submit a Test Record:
Create or update an Opportunity record so that the discount exceeds 15% and submit it for approval. - Check the Approval Process:
- Email Notifications: Verify that email alerts are sent to the Sales Manager and the submitter.
- Record Locking: Confirm that the record is locked during the approval process to prevent further changes.
- Approval/Rejection Actions: Approve or reject the test record and observe whether the final actions (e.g., field updates, notifications) are executed as per the flow of our approval process.
Create any opportunity/open existing one and set Discount % greater than 15:

Submit it for approval and check behavior:


Before Approval:

Post Approval/Rejection check if all specified steps are executing:


Also Read – Types of Exceptions in Salesforce
FAQs
1. Can you define an Approval Process in Salesforce?
An Approval Process automates the review and approval/rejection of records (e.g., Opportunities, Contracts) by managers or specific users or roles. Use Cases: Budget approvals and Opportunity discount approvals.
2. What are the key steps in the Approval Process?
Define Entry Criteria: Specify which records trigger the process (e.g., Opportunity Stage = “Pending Approval”).
Set Approval Steps: Assign approvers (user, role, queue, or hierarchy-based).
Configure Actions: Define email templates, field updates, or processes on approval/rejection.
3. After activating the approval process, I want to add one more step. Is it possible?
It’s not possible to add one more step, deactivate the approval process and clone the deactivated approval process and add the new steps.
4. Can a record be automatically approved, rejected or skipped based on specific criteria?
Yes, we can set entry criteria for each step of the process and configure the approval process in such a way that it can approve, reject or skip the approval process if a record does not meet the criteria.
For example, all the expenses submitted by the user with an amount not exceeding or less than $15 are automatically approved.
Conclusion
Salesforce approval processes streamline workflow automation by ensuring compliance, liability and efficiency. This blog covered key concepts, from defining approval steps to configuring actions, with a practical example of a sales discount approval process.
By implementing an approval process, businesses can:
- Automate critical approvals with structured steps.
- Improve liability through audit trails.
- Enhance efficiency by reducing manual effort.
- Customize field updates to fit unique business requirements.
Using approval processes helps organizations scale efficiently while maintaining control over key transactions. With careful planning, testing and refinement, we can optimize our approval process for maximum impact. Happy automating!


