


Reliable data is vital in Salesforce. Validation rules enforce this by checking records before they’re saved. They stop incorrect or incomplete information, enforce proper formats, prevent invalid stage changes, and ensure related fields are filled as required.
How does the Validation rule work?
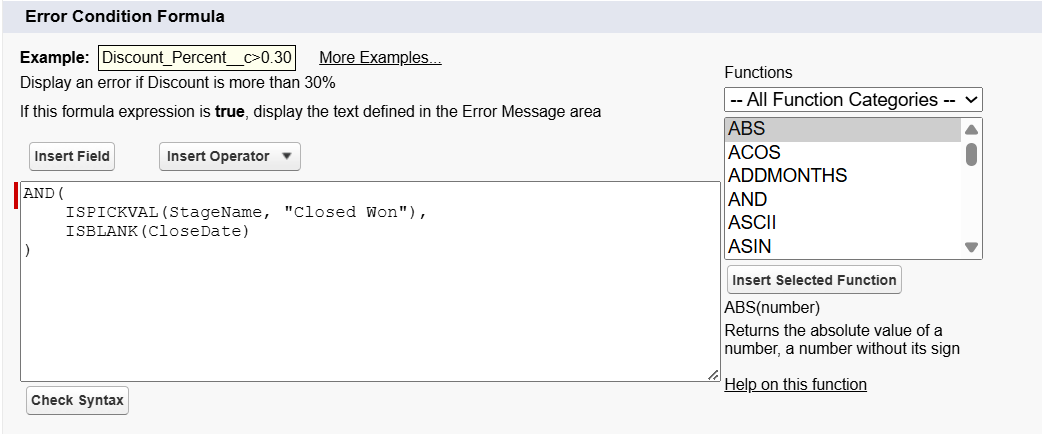
Rule Criteria
Rule criteria specify the exact conditions a record must meet before Salesforce allows it to be saved. These conditions are usually set using formulas that reference fields, functions, and logical operators. For example, the Close Date is required when the Stage is Closed Won.
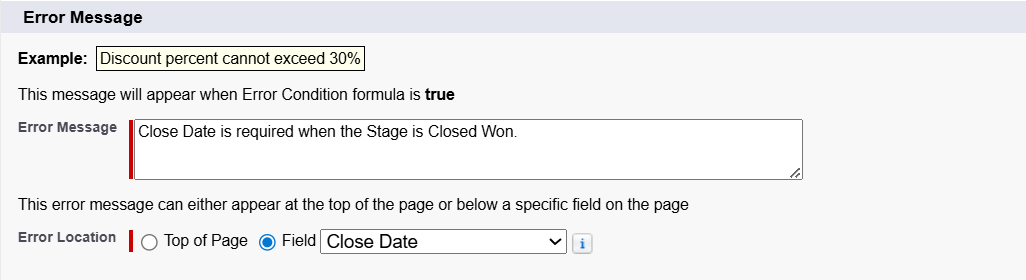
Error Message
When a record doesn’t meet these conditions, Salesforce shows an error message. Writing error messages in clear, simple language is important so users know exactly what needs to be fixed. Placing the message right next to the field in error makes it easy to spot the problem and update the data quickly.
Examples of Validation Rules in Salesforce
Validation rules in Salesforce help maintain clean, accurate, and reliable data. They ensure that records meet the right conditions before being saved. Here are some examples of how they can be applied:
- Checking Data Format
Validation rules can make sure information follows a specific format. For instance, you can require a serial number to be entered in the format ABC-1234 and reject any other format. This helps maintain consistency in fields like product codes, employee IDs, or membership numbers.
- Restricting Invalid Status Updates
Validation rules can stop users from moving a record backward in its workflow. For instance, once a Case is marked as “Closed,” you can block any attempt to switch it back to “In Progress.” This keeps the service record accurate and prevents confusion in tracking case resolution.
- Making Fields Dependent on Each Other
Some fields only make sense when paired together. For example, if a discount percentage is entered on an Opportunity, the rule can require the discount reason field to be completed as well.
- Completing Address Details
A validation rule can make sure location information is complete. For example, if a City is selected on a Contact record, the Postal Code field must also be filled in before saving. This ensures accurate mailing and delivery.
- Keeping Numbers Within Limits
Validation rules can set numeric boundaries. For example, on a Donation record, you might prevent amounts above 1,000,000 or below 1. This avoids accidental typos or unrealistic entries.
Manage Validation Rules Faster with XL-Connector
Creating validation rules in Salesforce is simple, but keeping them updated over time can be tedious—especially if you have dozens to manage. XL-Connector makes this easier by letting you work with all your validation rules directly in Excel.
With XL-Connector, you can:
- Create multiple rules at once when setting up new processes.
- Update several rules together to match policy or formatting changes.
- Review and clean up old rules in a single spreadsheet view.

Because XL-Connector is a comprehensive metadata management toolkit, it saves administrators hours of repetitive work and helps maintain consistent data standards.
Check out the full blog to learn how XL-Connector can simplify validation rule management.
Tips for Testing Validation Rules in Salesforce
Validation rules help keep your Salesforce data accurate, but if they aren’t tested properly, they can block the wrong entries or frustrate users. Testing them carefully will help you spot issues early and keep your workflows running smoothly.
1. Understand Why the Rule Exists
Start by looking at the exact business need behind the rule. Be clear on what should happen when the rule triggers and when it should allow data entry.
2. Create a Variety of Test Scenarios
Plan cases where the rule should block changes and cases where it should allow them. Cover both “pass” and “fail” situations so you know the rule works in every expected case.
3. Work with Sample Data
Use data that reflects the kind of information your team actually works with. Try different combinations of field values to see how the rule behaves in various situations.
4. Test with Different User Profiles
Run your tests for users with different roles and permissions. This way, you’ll know the rule works as expected for everyone, whether they have full access or limited access.
5. Check Across Record Types
If your org uses multiple record types, test the rule for each type to confirm it behaves consistently.
6. Review Error Messages
Ensure error messages are concise, clear, and helpful. They should guide users on what went wrong and how to fix it without extra back-and-forth.
7. Test with Bulk Data
See how the rule works during mass updates or imports. It should maintain performance while still protecting data accuracy.
8. Do a Regression Check
Whenever you change a validation rule or make other updates in Salesforce, re-test your existing rules to confirm nothing else has been affected.
9. Try the Salesforce Developer Console
The Developer Console is a quick way to test how rules react when you create or update records, without touching your live data.
10. Keep a Record of Your Tests
Write down your test cases, results, and any changes made. This will make future testing easier and help when working with teammates.
11. Look at the Audit Trail
After testing, review the audit trail to see exactly when the rule was triggered and what happened.
12. Find the Right Balance
Don’t make rules so strict that they slow people down. Aim for rules that keep data accurate while still allowing your team to work efficiently.
Conclusion
Thoughtfully implemented validation rules protect data and guide users to enter information correctly. Managing many rules over time can be tedious, but XL-Connector simplifies this by allowing bulk review and updates directly in Excel.
Keeping validation rules current ensures consistent data, efficient processes, and a Salesforce org that functions as intended.


